
Building your Power BI CI/CD pipeline with GitHub Actions (Part 1)
Step-by-step guide for automating BPA with GitHub Actions — the first and simplest step in your Power BI CI/CD journey

In my previous post (Part1 and Part2), I covered the key decisions and considerations for building a CI/CD pipeline for Power BI projects.
In this one, I’ll walk you through how to set up a simple workflow to run the Best Practice Analyzer (BPA) using GitHub Actions (GA). This is just the initial setup, so I won't dive into the broader CI/CD pipeline yet — but it’s a solid first step to get familiar with both BPA and GitHub Actions.
You can find all the example files and workflows mentioned in this post in the following GitHub repo.
Here’s what this walkthrough will cover:
Creating a new GitHub repository
Pushing a dummy Power BI project file (
.pbip)Creating a GitHub Actions workflow to:
Download and install the latest version of Tabular Editor 2.x
Run BPA with the default ruleset
Run BPA with a custom ruleset
Deciding when the workflow should be triggered:
Manually
After each commit
On pull requests (e.g., targeting the
mainbranch)
Step 0 - Prerequisite: Create a GitHub account
If you haven’t already, create a GitHub account.
Step 1 - Create a new repository
Go to your GitHub profile → Repositories tab
Click New

Add name, description to your repo
Choose Public or Private - I set mine to Public so others can follow along — feel free to go Private if needed
Clone the repo to your computer
If you are using VS Code:
Open a blank VS Code instance
Start a Terminal and run:
git clone https://github.com/THE_NAME_OF_YOUR_REPO.git "C:\Users\EXAMPLE\WHERE_YOU_WANT_TO_STORE_YOUR_REPO"That’s it! Now let's add a Power BI project to your repo.
Step 2 - Push a dummy Power BI project file (.pbip)
We’ll use a sample Power BI project file based on Contoso data.
If you’re not familiar with the Contoso data generator, check out this GitHub repo - it’s full of files ready-to-use in csv, parquet, etc formats, ranging from 10K to 100M rows. For this demo, we’ll use the 10K rows .pbix version.
Download and extract the file
Open the
.pbixfile in Power BI DesktopGo to File → Save As and choose the folder where your repo is located
→ Make sure to save it as a.pbipfile!Back in VS Code:
Go to the Source Control tab (left sidebar)
Stage all changes (+ sign under the blue Commit button)
Add a commit message (e.g.,
"Initial commit with PBIP file")Click Commit
Then click Sync Changes to push it to GitHub


You should now see your Power BI project in your GitHub repo!

Step 3/A - Create your first GitHub Actions workflow
In your GitHub repo, click the Actions tab
Select "Set up a workflow yourself" at the top

Give your workflow a name (e.g.,
Standard_BPA_Runner.yml)

Paste this code
Scroll to the bottom and look for the following part:


🔍 What This Command Does
./TabularEditor.exe: GitHub Actions launches Tabular Editor"Contoso 10k.SemanticModel/definition/database.tmdl": the semantic model file to analyze ⚠️ Adjust the path if your project structure is different-A:Run the BPA. Check the Tabular Editor documentation about CLI for more info.The URL points to the official ruleset
Tee-Object -FilePath "./BPA_output.txt": saves the output to a text fileClick on Commit changes…
▶️ Run the Workflow
Go to the Actions tab
Select your workflow (left panel)
Click "Run workflow"
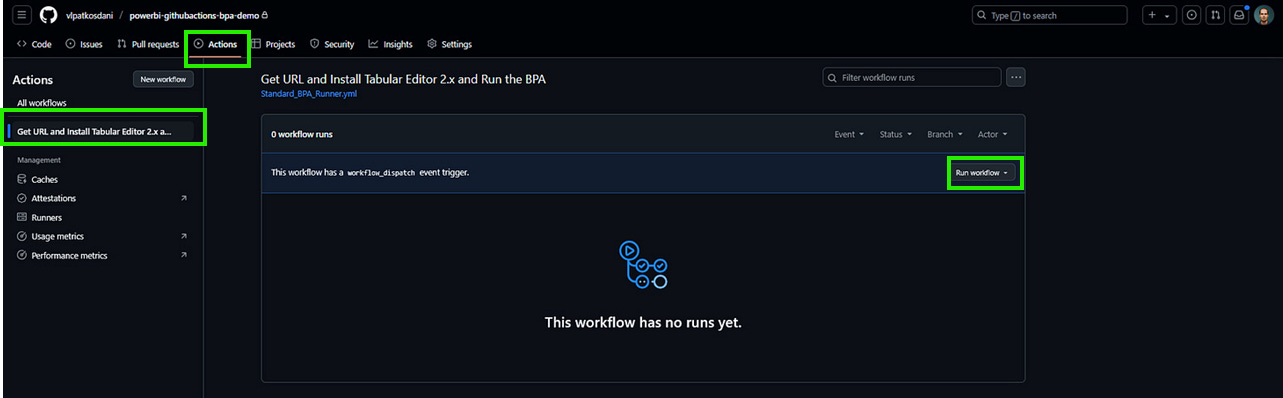
After a few seconds, the job will start. Click to see real-time output.

You’ll see that the workflow failed ❌?!
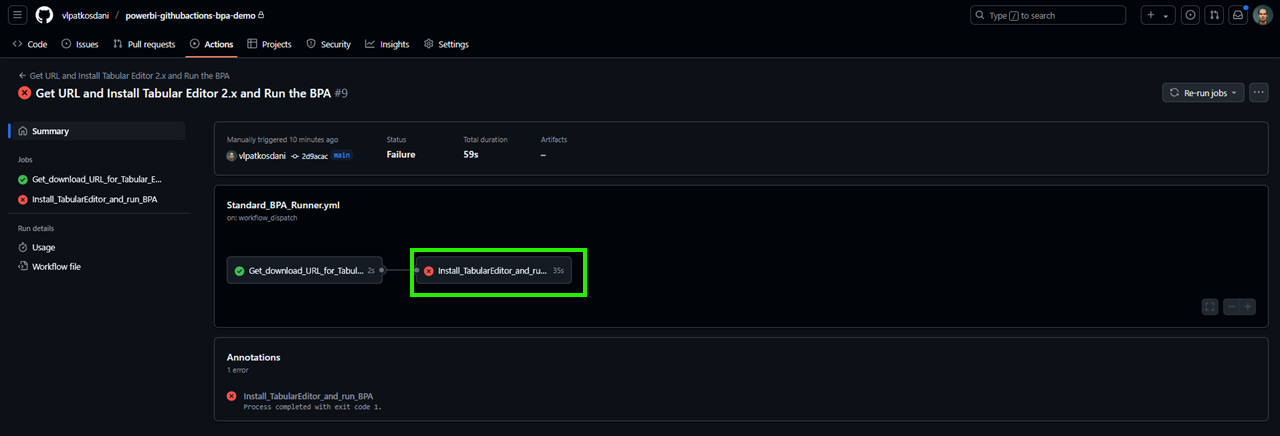
Let’s see what went wrong and click on the failed step (marked red).

Between lines 12–38, everything seems to be fine — just what we’d expect. But then we hit an error message that’s a bit hard to decipher at first:
🛑❗“Error: Process completed with exit code 1.“❗🛑
This one puzzled me for quite a while the first time I ran into it - even though the root cause is fairly straightforward. As I explained in my previous article, GA behaves differently then running Tabular Editor manually. If BPA encounters a Severity 3 issue, the execution will stop and mark the workflow as failed.
Before we move on…
Why do I think this default behavior isn’t ideal?
Because based on the generic error message, you can’t tell where (which column, measure, or object) or why (which BPA rule) the workflow failed. That’s not particularly helpful in a CI/CD process.
And even if you manage to fix that one issue, if there are multiple violations with Severity 3, the workflow will fail again the next time you run it — without giving you a complete picture. You’ll have to run it over and over, fixing one problem at a time.
To me, this approach could definitely be improved and made more user-friendly — and that’s exactly what I’ll cover in my next post.
Step 3/B - Modify your first GitHub Actions workflow
So let’s tweak our script and run a custom ruleset that checks just one specific best practice — for the sake of simplicity: encouraging DAX developers to use the DIVIDE() function instead of the / operator.
We’ll do this in three steps:
I) 📝Create Your Custom Ruleset
II) 🔁Modify the YAML Workflow
III) ➕Add a Measure to Break the Rule
I) 📝 Create Your Custom Ruleset

In your repo on GitHub, go to the Code tab
Click Add file → Create new file
Name it
BPA_Rule.jsonand paste the following single rule:[ { "ID": "DAX_DIVISION_COLUMNS", "Name": "Avoid division (use DIVIDE function instead)", "Category": "DAX Expressions", "Description": "Calculated Columns, Measures or Calculated Tables should not use the division symbol in their expressions (/) unless the denominator is a constant value. Instead, it is advised to always use the DIVIDE(<numerator>,<denominator>) function.", "Severity": 2, "Scope": "Measure, CalculatedColumn, CalculatedTable", "Expression": "Tokenize().Any(\n Type = DIV and\n Next.Type <> INTEGER_LITERAL and\n Next.Type <> REAL_LITERAL\n)", "CompatibilityLevel": 1200 } ]
II) 🔁Modify the YAML Workflow
Update the BPA command in your .yml workflow to use the local BPA_Rule.json instead of the URL.
Modify the code to this (first we want to run BPA with the default ruleset) or simply get the full code from here.
./TabularEditor.exe "Contoso 10k.SemanticModel/definition/database.tmdl" -A "./BPA_Rule.json" `

| Tee-Object -FilePath "./BPA_output.txt"
III) ➕ Add a Measure to break the rule
In Power BI Desktop, add a new measure:
Division not following BP = [Margin] / [Total Cost]
Save the project
Go to VS Code
Commit & Sync your changes
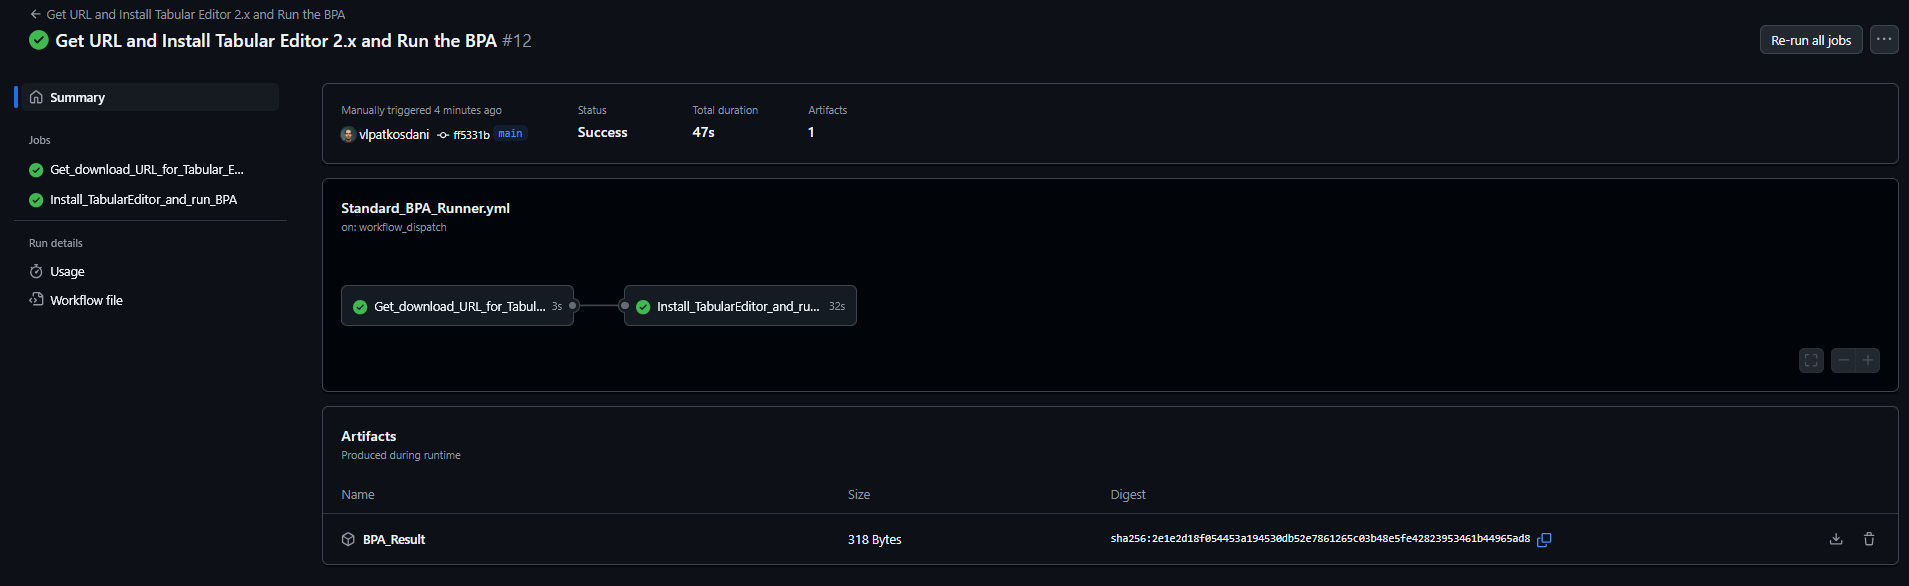
Now let’s re-run the workflow!
You’ll see that this time, BPA runs successfully and flags our rule violation.

Now that you’ve seen how it works, you can start experimenting with your own set of rules — just modify the BPA_Rule.json file and add or remove any rules as needed.
In my next post, we’ll take a deeper dive into how to handle rule violations in bulk — without breaking the workflow.
Step 4 - Automate workflow trigger
Currently, the workflow only runs manually.
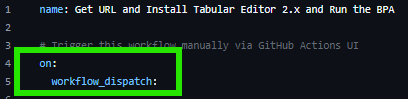
If you want to trigger it on every commit or pull request, just update your .yml trigger section - the beggining of the code.
Start by removing the following lines:
Change it to this to run on Commits (push) - it might be an overkill though.
name: Get URL and Install Tabular Editor 2.x and Run the BPA

# Trigger this workflow manually via GitHub Actions UI
on:
  push:
    branches:
      - main
Change it to this to run on Pull Requests on the main branch:
name: Get URL and Install Tabular Editor 2.x and Run the BPA

# Trigger this workflow manually via GitHub Actions UI
on:
  pull_request:
    branches:
      - main
That’s it! 🎉
You’ve just built the foundation for CI/CD in a Power BI workflow.
Even though we’ve only touched on the basics — default and custom BPA checks — this approach already opens the door to better code quality, collaboration, and automation.
In the next post, we’ll build on this by analyzing BPA results programmatically and laying the groundwork for validation at scale.
Feel free to explore more BPA rules, automate your workflow further, or even integrate it into a larger CI/CD setup — which I’ll cover in the next post.
👉 Everything shown in this article is available in the corresponding branches of the GitHub repo:
📂 Repo: powerbi-cicd-with-githubactions-demos